
3 Costly Mistakes to Avoid while Preparing for Open Enrollment
Open Enrollment season is among us, and customers all over the US are busy creating to-do lists, strategizing their communication plans, and working overtime to make this year’s experience better than the last. With so much to do, it’s easy to overlook some of the most important steps while configuring OE in UKG Pro. As a UKG employee and client, here are some of the most common mistakes I’ve seen others make, and suggestions on how to avoid them.
1) Choosing the wrong effective date.
Nailing down the right effective date is arguably the most important step while setting up OE in UKG Pro. If you submit deduction/benefit updates with the wrong date, it can lead to inaccurate data during OE and even affect current payroll calculations and existing Life Events.
Not sure where to start? Use UKG's pending effective dating worksheet to get it right. This worksheet uses your payroll start/end/pay dates, OE session start/end dates, and other data points to recommend a pending effective date. Even if you’re confident on what date to use, utilize this tool for peace of mind. You can find the worksheet as well as instructions on how to effectively use it in the UKG Community.
Once you have the desired date, use it while configuring the below business rules:
Calculation Rules
Option/rate tables (think medical, dental and vision tiers)
Employee and employer rates
Goal rules and amounts
Enrollment Messages
Deduction/benefit types (shown as A in screenshot below)
Deduction/benefit plans (shown as B in screenshot below)
Benefit options (shown as C in screenshot below)
Contingencies
These are parent/child relationships set up under deduction/benefit plans. Most common are high deductible health plans and health saving account plans, or employee supplemental life and dependent life plans.

2) Speed Testing.
Testing is essential for spotting issues before they affect your employees, so don't rush this step! In fact, I would give yourself at least 2 weeks before your OE session start date to complete testing. Knowing what to watch for and completing thorough testing can save you time and stress once OE is in full swing.
Did you know that you don’t need a test environment to complete testing? You can do this directly in the Benefits Admin module within your Production environment, as long as the OE session is set to Test mode. To change your session’s status, navigate to Admin > Benefits Admin > Current Sessions > Select session name > Change status to Test > Select Save > Close out of window (fun fact- you do not have to select Next until the Session Summary tab).

Once in Test mode, lookout for the following:
Rates: Test every deduction/benefit plan under multiple employee types and every deduction/benefit group. Don’t stop with one employee’s view.
Contingencies: Attempt to elect a child plan without electing the parent, and confirm you receive an error on the Summary page. Note, contingencies do not prevent an employee from selecting a HDHP and HSA plan. However, the employee will receive an error at the end of OE and not be able to submit their session.
Formatting: Ensure your enrollment messages, links, and graphics populate as expected.
Beneficiaries/Dependents: If you choose to make this page editable, ensure hyperlinks are available but do not change anything during testing since these changes will apply to Prod even if the OE session is in Test mode!
General Settings: Double-check that required plans are in fact required, employees cannot decline plans that have ‘do not decline’ settings, etc.
Qualifiers: Ensure the correct employees are populating under ‘Employee Elections’ based on the qualifiers you selected within the OE session.
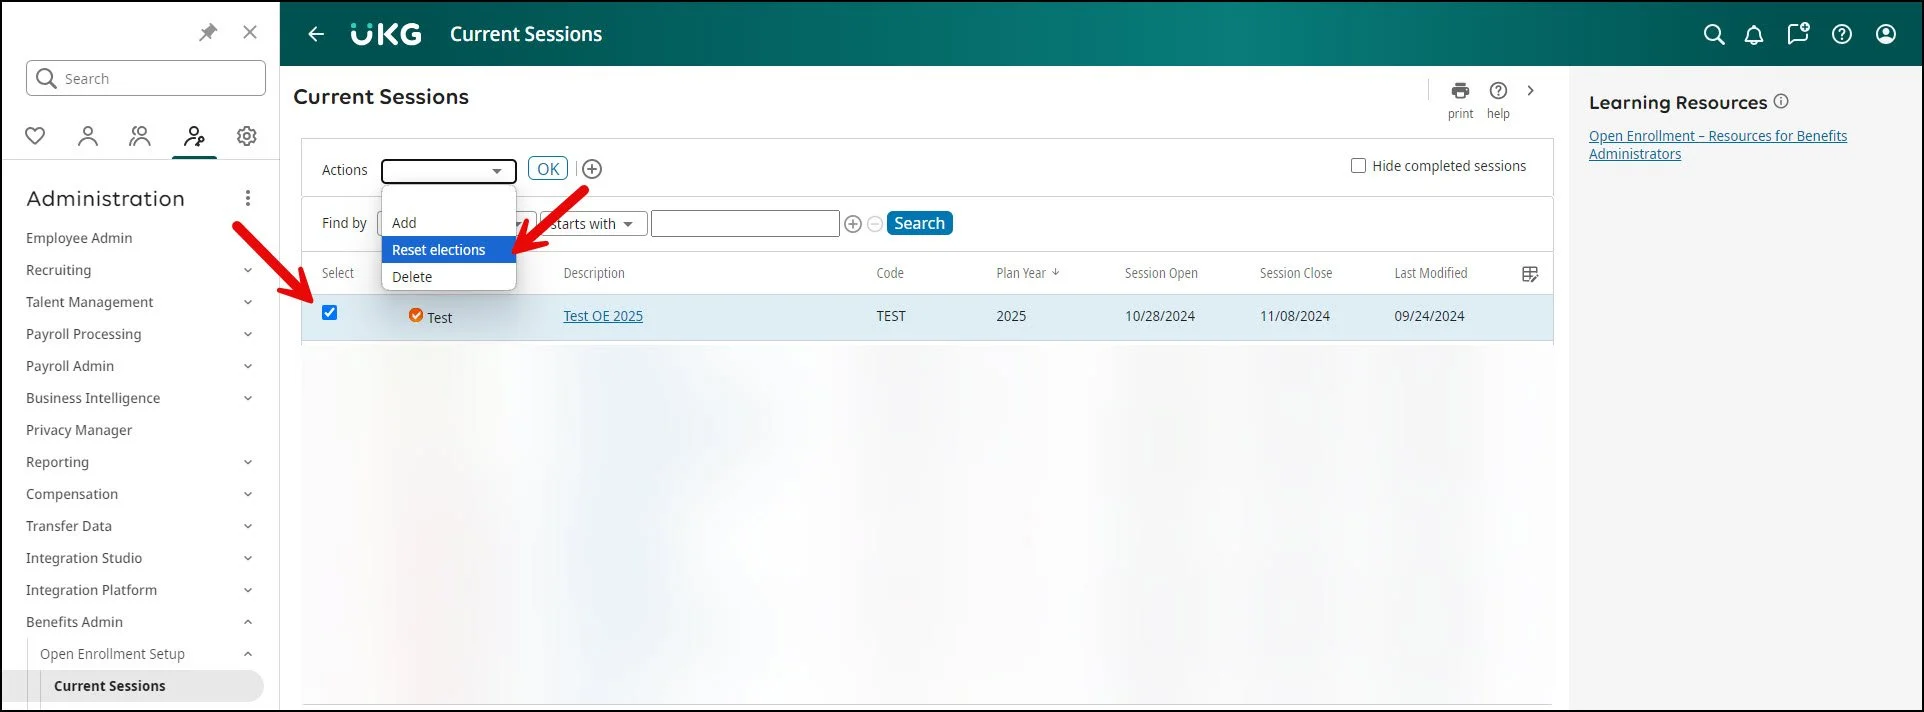
Once you’re done testing, always reset elections. You can do this under Admin > Benefits Admin > Current Sessions > Select session name > Next to Actions, select ‘Reset elections‘ from the drop-down > Select OK. Once submitted, double-check the ‘Employee Elections’ tab to ensure the test employees’ statuses have changed back to ‘Not Started’.
3) Neglecting Reporting.
Unfortunately, you won’t find many benefit reports under Reporting > Standard Reports > Available, but you can utilize BI to uncover valuable insights, keep your employees on track, and improve future enrollment periods.
Here are some of the areas to focus on first:
Sample and Delivered Reports: Before creating a report from scratch, review the sample and delivered reports that have been published in BI by UKG. Though they can be outdated, they can be a good building block and teach you something new!
BI Exchange: Leverage what other customers have built and published in the UKG Community under the BI Exchange. If they found a report helpful enough to post it, odds are that you will to!
Custom Reports: If you’re a BI Author, create your own reports using the Administrator Package. However, watch out for duplicate field names. Although a data field might have the same name, it’s saved in multiple folders for a reason. For example:
To view a deduction/benefit plan that was elected in OE, navigate to the Admin Package > Open Enrollment Reporting > Employee Elections Details > Deduction/Benefit Code.
To view a deduction/benefit plan that is already tied to an employee’s profile, navigate to the Admin Package > Employee Information > Employee Deduction/Benefits > Deduction/Benefit Code.
To view a deduction/benefit plan in payroll history, navigate to the Admin Package > Employee Information > Payroll History Information > Deduction/Benefits Check History > Deduction/Benefit Code.
We hope these tips are helpful for you during your OE journey! For more advice or assistance with preparing for OE, don’t hesitate to contact us!